UTVGuide.net’s Kawasaki Teryx Buildup Project
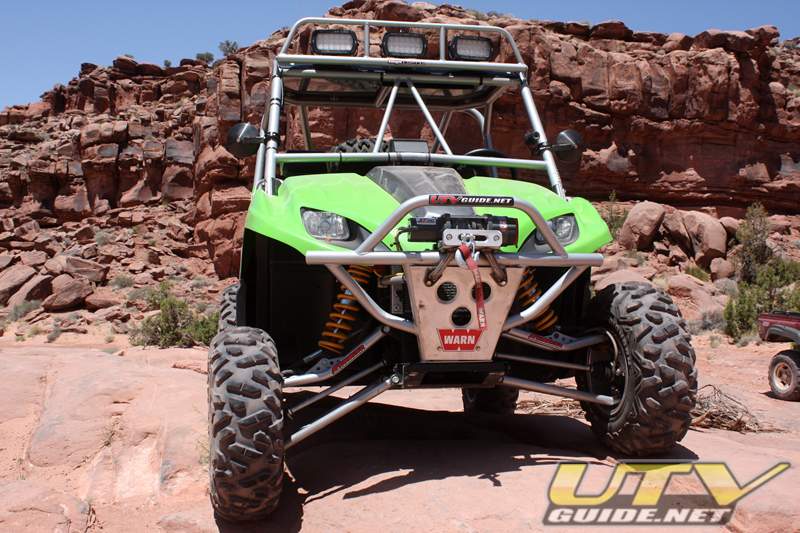
UTVGuide.net's Kawasaki Teryx Buildup
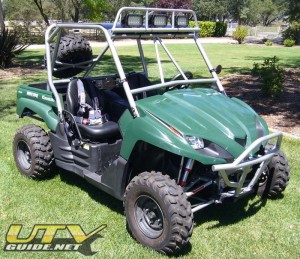
This 2008 Kawasaki Teryx was a buildup project for www.UTVGuide.net and was featured in Side x Side Action Magazine.
Riding with my family has been rewarding in our four seat Rhino. The ability of all four of us to pile in together in the Rhino has had its advantages and disadvantages. Will we be able to transition the ridge with sufficient power? Is it safe to be on the trail with only one vehicle when we are just out with the family? Our children are also getting bigger, and would soon grow out of the Rhino’s back seat. The extra weight not only stretches the limits on performance, but affects how well the vehicle handles. After purchasing our RZR, and seeing the difference in two seat vs. four seat, I started weighing the benefits of owning two UTVs that were both setup as two seaters. When the Teryx came out last winter, I decided that it was time to sell the Rhino and build a two seat Teryx to complement our two seat RZR.
With a Teryx in the garage, I started to come up with a plan to customize it to meet my needs.
Suspension
Where I ride, I don’t have any issues with narrow trails. Going wider was not a problem, but how far to go was. I knew that I would like to upgrade to a long travel suspension on the Teryx so I could get a more stable, smoother and more capable ride. Six inch over a-arms seem to have become the “standard” for long travel Rhino kits, but the Teryx is already four inches wider than the Rhino in stock form. In my opinion, a six inch long travel kit would make it over 70 inches wide and that just seemed to make it too wide for my taste.
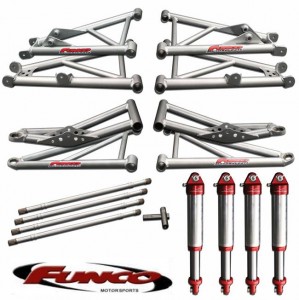
Thankfully, there are a few manufacturers out there that are making Teryx kits that agree with my line of thinking. And as luck would have it, a company I have always admired in the sand car industry has jumped into the UTV world. Funco Motorsports is nothing short of legendary in the off-road world, so I was really excited when Grant George told me their Teryx kit would be a +4” a-arm.
To complement the Funco long travel kit, I decided to add a few new components. The first was the choice of shocks. Funco offers two options for shocks – traditional coilover or air shock. Ever since I ran air shocks on my KFX450R, I have been waiting to try an air shock on a UTV. I was happy to find out that Funco teamed up with Sway-A-Way for the air shocks. Sway-A-Way has been building off road, street, truck, and circle track suspension and driveline components for more than 39 years, but they are pretty new to the UTV scene. The new 2.5” Racerunner Air Shocks have a larger piston area and oil capacity than a typical 2.0” shock so they are better suited for heavier vehicles and long travel applications. Since the shocks are suspended by air, they are very adjustable, and without a coil spring, they definitely get your attention.
The second change I wanted to make was to swap out the stock sway bar for one that was tuned for my new suspension. The Teryx comes with a sway bar in the rear, but I knew that a sway bar that was designed for the Funco long travel arms would do a much better job at controlling body roll during hard cornering. After talking with Frank from iTi Performance Motorsports at the Extreme Motorsports Expo, I was sold on not only replacing the stock rear sway bar, but also adding a sway bar up front.
Roll Cage, Bumpers & Doors
SDR Motorsports is a new name for UTVs, but the guys behind the company have been building roll cages and other parts for UTVs for several years now. I had worked with Tim Berendes during my Rhino build, and was very happy with the quality of his work. I knew that I wanted a two seat cage, but SDR hadn’t done a two seat Teryx cage yet. I just gave Tim a few constraints and left the rest in his capable hands.
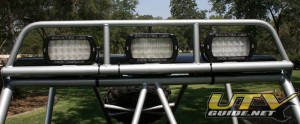
In addition to the cage, SDR Motorsports built a light bar for three Baja Designs LED lights, front and rear bumpers and half doors. The half door concept is great; it keeps your legs safe, but they aren’t so tall that you actually need the door to open.
And if you look closely at the rear bumper, you will see that there are bars that go up to the bottom of the bed and meet up with the rear bars from the roll cage. This innovative concept gives the roll cage much more strength without having to come outside and around the bed.
To top it all off, I added an aluminum roof to offer some shade for those scorching trail rides.
Lights
When adding lights to your UTV, you want to make sure they are durable and put out a lot of light where you want it. Another key component to adding lights on a UTV is power consumption. UTVs typically have a pathetic charging system, so you will want to make sure that you don’t draw more than your stator can put back in. The Baja Designs 4” Fuego HIDs I used on my RZR and Rhino definitely fit the bill, but when I found out Baja Designs had a new LED light, I figured it would be interesting to try something new.
The Soltek LEDgend light has 18 LEDs that produce 2880 lumens of raw lighting. And the power consumption is similar to HID lights, but unlike HIDs, LEDs do not require an initial high-voltage spike to start up. The lights also have a durable polycarbonate lens that serves as a built-in rockguard, and also allows you to swap between spot, driving, cornering, and flood patterns in just minutes.
To easily wire up my lights, heated seats and other accessories, I used a fuse/relay block from Autotrend. I used their panel before on my RZR, and it really makes wiring up 12V accessories a breeze.
Seats & Restraints
When it comes to seats, I have always turned to PRP for safety, comfort and style. With this project I wanted the lap belts to fit over the edge of the seat instead of through a slit so I could take my seats in and out easily. Mitch over at PRP had no problem with this request, and since I am not very good at choosing colors and patterns he took on that task too. The seats look great and are ever more comfortable than the PRP seats I have had in the past. Not to mention the seat heaters work awesome in my RZR, so I just had to do it again for the Teryx.
To get the PRPs mounted up in the Teryx, I turned again to SDR Motorsports. Their seat bases lower the seat height just over 1 inch, and also have a hole in the center that allows suspension seats to actually work properly.
I always replace the factory seat belts in my UTVs with a 4 or 5 point style restraints. In my opinion, you’d be nuts to do any serious recreational riding without a good set of restraints that are properly installed. For this project, I went with a set of 2 ¼” D3 restraints from Simpson. Simpson has been making safety equipment for racing and recreational vehicles since 1959, but it was a few unique features of the D3 restraint that made my mind up.
The D3 provides the ease and convenience of a sewn in harness without the harness being sewn to the lap belt. The unique design eliminates two links but still allows the shoulder harness to be joined closely together at the buckle, emulating a true latch and link racing system. D3’s are also made from polyester instead of nylon. Polyester belts are superior to nylon at absorbing energy during a crash, and the affects of exposure to the sun and rain is also less than nylon.
Performance
Unlike some of the other UTVs out today, the 750cc v-twin engine in the Teryx is well suited for engine performance upgrades. Although I am not a big fan of screwing around with the reliability of a stock engine, I decided to do some mild top-end changes. Four Stroke Tech has several different flavors of performance kits for the Teryx. I went for the mildest of upgrades which is a standard bore kit that includes 11.5:1 custom pistons built by Wiseco, stage 2 custom cams ground by Web Cam and FST HD valve springs. The best part is it can run on 91 octane.
I was a bit concerned about finding a shop to install the FST performance kit. Getting the jetting right on the v-twin seemed to be causing a few people some issues that I wanted to avoid. But after seeing a beautifully built up Teryx at the ORBA Supershow, I started trading emails with Kevin Kohrell at Custom Creations. It turned out that they had already performed the same upgrade to their Teryx, and he could do the same to mine. So after Funco installed the long travel, my Teryx went across town to Custom Creations, where they installed the FST engine kit, added a breather for crank case and also jetted the carbs. Everything went together nicely and the jetting was spot on.
With the addition of the Four Stroke Tech standard bore performance kit, I wanted to make sure any extra heat was dealt with. I hate to worry about overheating, so I would rather make sure there isn’t going to be an issue. Thankfully, PWR Performance makes a direct replacement radiator and fan for the Teryx. With a 42mm thick 1 row core and a new 9” Spal fan with shroud, the PWR radiator fits in the stock location, but adds 30% more cooling capacity and a little peace of mind.
After you improve performance and add extra weight for a roll cage, bumpers and a light bar, a little clutch work should be done. EPI was my choice for this project. With a new primary and secondary spring plus new weights, the CVT is setup to better grip the belt which reduces belt wear and heat.
As you have probably figured out by now, I don’t like to mess around with the internals of my UTVs. I typically leave that to the professionals. My Teryx was back up home in northern California, and thankfully Hart’s Rhino Motorsports opened a UTV shop in the Sacramento area a few years back. Paul had done work on my Rhino CVT in the past, so I was real comfortable with his abilities. While my Teryx was at the shop, Hart’s Rhino Motorsports installed the EPI clutch kit, the PWR radiator and also mounted up the Bighorns on my DWT beadlocks.
The Teryx seems like it is detuned from the factory, so I felt that a CDI would not only raise the speed limiter, but also juice up the performance a bit. Velocity Devices CDI for the Teryx that has a preloaded performance map that allows the machine to run cooler, produce more horsepower and more torque, while minimizing fuel consumption. The CDI parameters can also be changed for your particular engine components and fuel grade.
To round out the performance upgrades, I went with a Muzzys Dual Exhaust. The result is a “Harley” like sound output, that doesn’t bust your eardrums.
Tires & Wheels
The Maxxis Bighorns on my Rhino worked very well, so I decided to stick with a sure thing. The only difference is instead of a 26x12x12 for the rear, I kept the front and rear at 26x12x9. Not sure if I like the looks of the same tire size front and rear, but the handling is fine.
For beadlocks, I went with DWT Racing. DWT wheels have been used as a platform for beadlocks for years, but they just recently started making their own beadlocks. DWT Performance Beadlocks include a robotically welded inner ring, CNC machined 6061 T6 outer ring and a proprietary multi-bolt / nut plate lock system.
Billet
Axia Alloys makes all sorts of trick billet aluminum goodies for UTVs. Their innovative clamping system allows you to choose from several different sizes of strap clamps depending on your roll cage tubing diameter, and apply these clamps to all sorts of accessories –lights, mirrors, grab handles, iPod holders and more. I decided on a panoramic rear-view mirror, side-view mirrors, a grab handle and a set of tailgate latches. My favorite is the panoramic rear-view mirror. It mounts very well and really gives you a great view of what is eating your dust.
GPS
When it comes to a GPS, it is hard to beat a Lowrance 540c Baja. The only problem for the Teryx is where to mount it. With the cup holders taking up the middle part of the dash, there isn’t enough space there. I decided on a roll bar mount, and Side x Side Outfitterz has a nice mount specifically designed to attach a 540c Baja to a bar across the front of the cage.
Plastic
I was initially going to paint my factory drab green plastic, but right before our trip to the Oregon Dunes, I found out that Maier had plastic ready for the Teryx. Since they had a lime green that is pretty dead-on for Kawasaki green, I decided to go with new plastic instead of paint.
I figured that plastic would be much more durable, and with the way Maier builds their hoods, the center section can be a different color. Their carbon fiber color looked great with the green, so it made the decision easy.
To finish off my Kawasaki theme, I had a sticker made for the tailgate that leaves no doubt that this is not a Rhino.
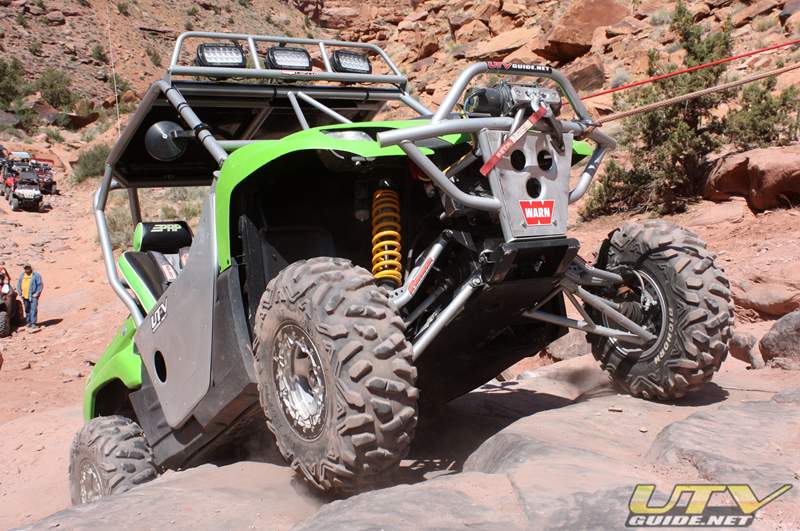
Kawasaki Teryx
 Specifications:
- Air Filter – K&N Filters
-
Exhaust – Muzzys
-
CDI – Velocity Devices
-
Pistons, Cams, Valve Springs – Four Stroke Tech
-
Breather – Custom Creations
-
Engine Kit Installation – Custom Creations
-
Radiator – PWR Performance
-
Clutch Kit – EPI
-
Clutch Kit Installation – Hart’s Rhino Motorsports
-
Seats – Premier Racing Products
-
Seat Bases – SDR Motorsports
-
Harnesses/Restraints – Simpson Racing
-
Side View Mirrors – Axia Alloys
-
Rear View Panoramic Mirror – Axia Alloys
-
Roll Cage – SDR Motorsports
-
Half Doors – SDR Motorsports
-
LED Lights – Baja Designs
-
Fuse/Relay Block – Autotrend
-
Factory HID Replacement Lights – Burke Moto Pros
-
Bumper – SDR Motorsports
-
Spare tire mount –SDR Motorsports
-
Fire Extinguisher Mount – Motorsports2
-
Long Travel Kit – FuncoUTV.com
-
Shocks – Fox Racing
-
Axles – FuncoUTV.com
-
Sway Bars – iTi Motorsports
-
UHMW Skid Plate – Factory UTV
-
Beadlock Wheels – DWT
-
Tires – Maxxis
-
Two seat mobile radio & intercom – Rugged Race Products
-
GPS (e.g. 540C Lowrance GPS) – Side x Side Outfitterz
-
GPS Mount (Roll Bar) – Side x Side Outfitterz
-
Plastic – Maier USA
-
XT 40 Winch – Warn
-
Billet Winch Fairlead – Custom Splice
Category: Custom Rides, Kawasaki, Sport

