Don’t OverLook the Suspension on Your Trailer
By Dave Blancett, RZR and Toyhauler Trailer Owner
Maintenance is key to an enjoyable off road experience, be it dunes, desert or forest. We all check fluid levels, air pressures (disregard the comments in my “Hook, Line, and Sinker” article…), general condition, and perform specific functions such as valve and chain adjustments. The list sometimes seems endless, and varies from machine to machine.
We give our ancillary equipment the same consideration…trailers get the cursory oil check for generators, air pressure checks for tires, and the truly brave will adjust those electric brakes to make sure everything stops as it should. The item most likely to be overlooked is one of the most important on the trailer…the suspension.
We add toys all the time, carry tools to do field repairs, and upgrade the equipment that those trailers carry, but sometimes forget just exactly how much all that stuff weighs, until something breaks. When was the last time you weighed your rig, fully loaded? That would be with a full tank of fuel for the generator, and a full tank of water, and reefer and/or ice chest full of ice and food. Most don’t tow great distances full of water or fuel, opting to fill both just before arriving at the intended destination. The last few miles are usually the roughest, as the road has probably transitioned to dirt and the ruts are unavoidable. This is the sort of stuff you are dragging everything over when it is at its absolute heaviest.
This is not a good time to be wondering what the condition of your suspension system components are.
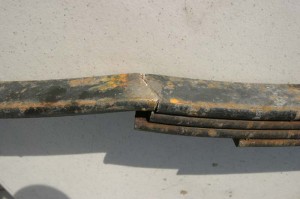
I got the double-whammy this past New Years at Dumont Dunes, because I had not paid the attention needed to mundane things like shackles and springs. We had to drag an 18k trailer in from Little Dumont because the river crossing was too treacherous, and I didn’t want to break anything. We managed to break a spring coming in on the trail, even though I was driving EXTREMELY carefully. Tires were aired own to 40psi (all ten, four on the truck, six on the trailer) and low range, 4wd engaged. I had no idea this had happened until I arrived at our camp and began the setup process. I found the broken spring while placing the wheel chocks. I was lucky that it broke where it did, as the axle was still correctly located by the remaining spring eye.
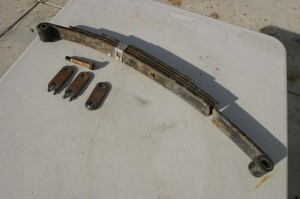
In the process of replacing the spring, I found a couple badly worn shackles. I could locate only one of the two new shackles I had, so I used the least-worn of the original pair when I reassembled the suspension on that axle. Did it occur to me that all the remaining original shackles might be just as worn? Well, yes, but I rolled the dice on that one, and they came up seven on the trip home.

Notice that the second leaf is also broken. I suspect it went first, the main leaf shortly thereafter.
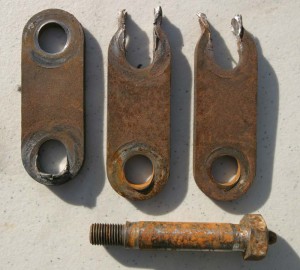
Turns out that there were two more shackles that really needed attention, but I was not to discover this until we were headed home. The second failure occurred somewhere between camp and the junction of Dumont Road and Hwy 126. I was doing my walk-around and noticed the middle wheel on the right side was out of place…not evenly spaced between the front axle and the rear axle. Here were two shackles the eyes torn out of one end, hanging from the loose end of the middle spring. A fairly quick trip back to vendors row, some creative fabrication by a fellow who was trying to pack up and go back to Baker, and I had a couple worthy shackles. I won’t bore you with the details of the installation, only tell you that we crossed the river at 12:30pm, and were underway on the highway at 3:30pm. Three hours, start to finish, wasn’t too bad, considering the operating conditions.
The moral of this story? Check your suspension components!
All the procedures I am about to describe assume that the reader possesses basic common sense and better than basic mechanical skills. There is also an assumption of a basic understanding of the operation of the systems described. If you do not have the appropriate equipment, or do not understand the instructions or procedures needed to safely lift and support your trailer, do not attempt to do any of the procedures described in this article.

Grooves in the shaft of the pin, torn out holes in shackles, and one about-to-tear shackle. Everything is being replaced. I’ll show you how I did it.
Empty your trailer first! Get rid of all that weight! Dump any fresh water! Take your tools out; you’re going to need them. Don’t lift more weight than you have to, after all, it’s your head that’s going to be under there.
If you have the appropriate equipment (sufficient jacks and appropriate jackstands) lift the trailer frame high enough to completely unload the suspension. Use a floor jack and raise and lower each axle at the spring perch, checking for excess play in the shackles and pins. Don’t be bashful about removing the nuts that hold the pins in place, but be sure to hold the bolt head with an end-wrench and only turn the nut. That is the only way you will be able to inspect those shackles. It will expose both holes on of one of the shackles, and if that one is worn, be assured the one on the other side of the spring eye is just as worn. Lack of lubrication is the culprit here. The pins that pass through the shackles and spring eyes are not intended to rotate. They and the shackles should be a solid unit when assembled, and the pins should pivot within the eyes of the spring, or any other suspension component they pass through. If the pins cannot, due to lack of lubrication and the increased friction in that spring eye, then the shackle starts to turn around the pin, elongating the hole to inevitable failure.
Now might be a good time to consider upgrading to heavy duty suspension components. Dexter makes a fine kit for two and three axle trailers that includes heavier shackles, new pins with grease fittings, bronze bushings to replace the plastic bushings in the spring eyes, and new equalizers (some call them rockers) to complete the installation. If you are suspicious of your springs, or they show obvious signs of damage, replace them too, now. My spring cost about $40.00. Cost will vary depending on the application. Multiply by four or six, and it’s still dirt cheap for the peace of mind you will have knowing the suspension carrying your toys around is in tip-top condition. Besides, it beats the snot out of replacing broken springs out there in the dirt, which sort of interrupts the fun.
If you’re feeling REALLY brave, take the time to adjust your trailer brakes while you have everything off the ground. It’s not hard to do, and will greatly enhance the towing experience.
These instructions apply to electric or hydraulic (surge) drum-type brakes.
All you need is a brake spoon, and perhaps a thin straight blade screwdriver. The spoon will tighten the star-wheel adjuster behind the oval access plug on the bottom of the backing plate. If your brakes are self-adjusting (and not performing as advertised) you will need the thin screwdriver to lift the self-adjuster pawl off the star wheel when you are setting the final clearance.
The method is simple. Tighten the star wheel until you cannot rotate the wheel any longer. Don’t worry about over-tightening the shoes. You will be hard pressed to crank that star wheel any tighter past the point where you cannot rotate the wheel and tire by hand. Now, use the brake spoon to back the star wheel OFF 14 clicks. You will do this by feel, and if you screw up and lose count or whatever, just tighten it up and start again. You will be amazed at how well your trailer stops when the brakes are correctly adjusted.
This sounds like a lot, and it is. This process is not for the faint of heart, and best if you can enlist a friend’s help. Expect to spend most of the day on this, so start early, just so you can chase parts when something breaks. If you think you might be replacing all the components described, order them in advance, because not all of this stuff is sitting on the shelf at your local RV supply store. You cannot believe how angry a spouse can be if the driveway is blocked by an out-of-commission trailer that cannot be reassembled because the parts to do so are on back-order, but that is another story.
Dave Blancett is currently switching out the entire system to Dexter E-Z Ride System.


